Manfred von Richthofen
Manfred von Richthofen was the most successful ace of World War I[1]. Between September 1916 and April 1918 he was credited with 80 confirmed victories. Richthofen served in the Uhlan Cavalry on the Eastern Front before transferring to the Luftstreitkrafte in 1915. Richthofen was initially an observer before learning to fly. He quickly earned a name for himself in the East as an aggressive pilot.
The German ace Oswald Boelcke, famous for the Dicta Boelcke, recruited Richthofen into Jasta 2. The Jasta was being formed as a crack German squadron for the Western Front. Initially equipped with the vastly superior Albatros DII aircraft, Boelcke and his Jasta, using Boelcke's revolutionary tactics, scored rapidly against the British and French aviation forces. Richthofen was one of Boelcke's star pupils.
Jasta 11
In January of 1917, Richthofen was given command of Jasta 11. This Jasta had not scored a victory during its operational life. It was a demoralised unit, requiring strong leadership and an instructive guiding hand. Richthofen supplied all this to the young pilots in the Jasta and Jasta 11 quickly became the most effective and feared scout squadrons on the Western Front.
Richthofen's command of this Jasta, and the subsequent increase in the Jasta's score, largely led to "Bloody April"[2]. In April of 1917 the Royal Flying Corps suffered heavily at the hands of the German Luftstreitkrafte. Jasta 11 accounted for a remarkable 97 confirmed victories in the month. In the space of one month, Jasta 11 essentially destroyed four squadrons worth of allied aircraft.
Jasta 11 would continue to be the predominant German Jasta until Richthofen's death in April, 1918. Richthofen's record as commander of Jasta 11 and JG1 were unparalleled in any aviation service of World War I. Richthofen was a brilliant, inspirational and respected leader who improved the operational effectiveness of all around him. The loss of Richthofen to the German forces in April 1918 cannot be understated.
The Controversy
Richthofen was shot down in an extremely active sector, filled with soldiers, artillery and aircraft. It would seem contradictory that the death of the best known aviation personality of the time could create controversy in such an environment. The basis for the confusion lies largely at the hands of the Royal Air Force. The controversy began with a mistake by the Royal Air Force. This mistake, rather than being corrected, was then perpetuated by a mixture of bureaucratic momentum and inertia.
The Royal Air Force Headquarters asked one claimant to resubmit a claim which the Headquarters then marked as conclusive. After having made this decision the RAF hierarchy was unwilling to go back on it. To maintain this mistake it appears that several pilots in the Royal Air Force were asked to follow the official version of events. In essence, they were asked to lie. This initial conspiracy plus the files being kept secret for fifty years led to the ongoing controversy. In the words of Franks and Bennett these factors;
... created a vacuum which was filled by rumour, speculation and pure fiction phrased for thrills. Each one fed upon the other until the truth was lost.
Another World War I aviation historian, Dale Titler, who authored "The Day The Red Baron Died" had equally scathing words for the media's interpretation of events;
For 52 years sensationalists have filled the undocumented gaps of this day with lurid and dramatic happenings. For all it was worth, they moulded the war drama of a national tragedy and highlighted the mystery and contention. In time, the facts of this gallant nobleman's violent finish became so enmeshed in fiction that the early war records and eyewitness accounts were submerged in a sea of fabrication.
Historians such as Frank, Bennett and Carisella have all published detailed historical works focused on the events of the 21st of April, 1918. Their focus has been to determine the sequence of events and the most probable claimant of Manfred von Richthofen's end. Their goal in this research has been to put to rest any remaining controversy surrounding the death of the "Red Baron".
The Le Hamel Region, 21st April 1918
The German Offensive in March 1918 had been stalled after much bitter fighting. The French Army had succeeded in halting the German Army short of Paris. This destroyed any German chance to take the French capital and would ultimately be the starving and exhausted German Army's last major ground offensive of the war.
The Australian Imperial Force had managed to stop the German Army short of Amiens in late March. The situation had been desperate with Australian infantry running low on ammunition. To solve this, Australian and British aircraft dropped blanket wrapped ammunition to the infantry. An aviation first.
The Le Hamel region was still a point of contention in April. The German Army had renewed supplies and reinforcements in preparation for another offensive on Amiens. The Luftstreitkrafte contributed to the build-up by bringing in Richthofen's Jagdgeschwader I (JGI). Richthofen's group was to wrest local air superiority from the Australian and British aviation forces. In early 1918, JGI was the elite German aviation force. The arrival of "Richthofen's Flying Circus" in the region was big news on the Amiens sector of the allied front.
The AIF was maintaining positions along Morlancourt Ridge which overlooked the Somme River and Welcome Wood. This was a commanding position above the German lines. Australian officers had positioned Australian artillery batteries to take advantage of this elevated position with the purpose of shelling German trench and artillery positions.
One of the major purposes of the allied and German reconnaissance squadrons was to spot enemy artillery positions. The Australians had camouflaged the positions of the artillery batteries along Morlancourt Ridge to protect against detection from spotter aircraft. To complement the camouflage several anti-aircraft machine gun positions were deployed around the artillery.
Lieutenant Garrett, No.3 Sqn Australian Flying Corps
In trench warfare a great deal of effort was expended by both sides, in the air and on the ground, to determine the concentrations and strength of their opponent. On the morning of April 21st, No.3 Squadron Australian Flying Corps waited for the morning fog to lift before sending out two RE8 aircraft to photograph the German troop concentrations near the town of Le Hamel.
The aircrew of the two reconnaissance aircraft were Lieutenant Simpson and Lieutenant Banks in one aircraft and Lieutenant Garrett and Lieutenant Barrow in the other. The observers, Banks and Barrow were taking photographs when their pilots noticed nine German Fokker Triplanes coming toward them. The RE8 crews bunched together in a tight pattern to defend each other and waited for the German aircraft to attack.
The German aircraft were JGI with Rittmeister Manfred von Richthofen leading them in an all red aircraft. The operational method in which the Jastas engaged reconnaissance aircraft was for the most experienced pilots in the Jasta to attack while the rest of the Jasta ensured they weren't disturbed by allied scout aircraft. Manfred von Richthofen and Leutnant Hans Weiss separated from the main formation and closed in on the two Australian aircraft.
The Australian and German aircraft fired exchanges before the all-red German aircraft of Richthofen's broke away. This left Weiss alone to face two experienced aircrews. Simpson and Garrett maneuvered their aircraft to allow their observers to concentrate their fire on the remaining Fokker Triplane. Splinters were seen to fly from the Triplane's wings and Weiss dove away. The Australian RE8's, not wishing to meet the remaining German aircraft quickly hid in a nearby cloud. When they came out the German scout aircraft were gone.
The Australian Flying Corps Submits a Claim
Historians now know that the aircraft that was hit in that engagement was Hans Weiss. He wrote that his rudder cable had been severed and that he lost significant lateral control of his aircraft. Subsequently he was unable to continue. Weiss wrote the next day;
I had attacked a flight of enemy reconnaissance aircraft and had a bullet cut a rudder cable. I had to return home because I was unable to turn properly.
The Australian aircrew returned to their aerodrome in Poullainville and filed a Combat in the Air Report (CITAR) as was the custom in the British and Dominion forces after an aerial engagement. Garrett submitted the report which read;
Two Fokker Triplanes painted dark with red noses. .... One triplane dived on is and the observer fired 120 rounds in bursts. One E.A.appeared t seperated from the others and might have gone went down but the Pilot and Observer were too busily engaged with the other E.A. to watch him down.
The CITAR does not claim that the aircrews shot down the Fokker Triplane that we now know is Weiss's. However the 3 Sqn Commanding Officer, Major David Blake, upon learning that Manfred Richthofen had been shot down put two and two together. He marked the CITAR Decisive. This is also likely where the strikeouts occurred on the report.
Historians have determined that the first triplane to break away was Manfred von Richthofen's. The question is why did he break away? Richthofen was well known for firing into an enemy aircraft until it either broke up in the air or caught fire. Richthofen's success in aerial combat was partly due to his superb marksmanship and his willingness to fire a lot of bullets into his target. It was not unusual to see Richthofen's combat reports contain that more than 500 rounds were expended to ensure his opponent was destroyed.
Much of Manfred von Richthofen's behaviour was consistent with a jamb in his Spandau machine guns. It was also considered standard practice when faced with a gun jamb to disengage and clear the gun before returning to the dogfight. Richthofen's behaviour suggests that a jamb was the reason for his disengagement.
Lieutenant Roy Brown, No.209 Sqn Royal Air Force
No.209 Squadron Royal Air Force (RAF) had previously been a Royal Naval Air Service (RNAS) squadron before the Royal Flying Corps (RFC) and the RNAS amalgamated into the RAF. Part of the reason for the amalgamation was to consolidate administration, the other reason was to stop the RFC and RNAS competing for British manufactured aircraft. The RNAS was also known for being more lenient when it came to aircraft markings. Richthofen's JGI were not the only aircraft with red markings on April 21st, Captain Roy Brown's flight of Sopwith Camels also had red noses and tails.
Captain Roy Brown was an experienced Canadian ace from Ontario. Canada lacked an independent air force and like many of his countrymen, he had enlisted in the British flying services instead. In April of 1918 Brown had nine victories to his name and was a respected flight leader in the squadron. Brown commanded A Flight which included the pilot Lieutenant Francis Mellersh and a new pilot to the squadron; Canadian Lieutenant Wilfred "Wop" May. The commander of B Flight was Oliver "Boots" Le Boutillier, an American ace from New Jersey.
The three flights (A,B and C) of No.209 Squadron took off from their aerodrome at Bertangles at 0945 hours to patrol airspace over the front lines. Their mission was to ensure that allied reconnaissance aircraft were not molested while trying to carry out their observation missions. Brown had in his flight May, who was new to combat and front-line operations. Brown had told May that if there was a dogfight, for May to head home without engaging. May's second combat on his third patrol was to be against the greatest ace of World War I.
Jagdeschwader I and No.209 Sqn Meet Over Le Hamel
Richthofen had rejoined his kette after the gun jamb and was flying alongside his inexperienced cousin, Leutnant Wolfram von Richthofen. The German formation noticed a flight of Sopwith Camels approaching from the direction of Le Hamel. This was Brown's flight. Richthofen's kette then spotted another flight of Camels. This was Le Boutillier's flight. The three formations converged and clashed in a dogfight. Lieutenant MacKenzie of Brown's flight was wounded in the initial trading of shots, most likely by German ace Leutnant Joachim Wolff and was forced to disengage.
Lieutenant Mellersh, also from Brown's flight was cornered. He was out-flown by the two Fokker Triplanes of Leutnant Joachim Wolff and Leutnant Walther Karjus. Brown saw this and went to his aid, driving off the Fokker Triplanes. After this Brown disengaged to keep an eye on his flight and to ensure they were not in trouble, especially "Wop" May. Manfred von Richthofen as commander of his flight had done the same, in particular to keep an eye on his inexperienced cousin, Wolfram.
Lieutenant May and Leutnant Wolfram von Richthofen had both followed their commanders orders and initially stayed out of the dogfight. Wolfram however had wandered too near May who was unable to control himself. He dived on Wolfram and fired both his Vickers machine guns until they jambed. May then dove away west heading for home. Firing air cooled machine guns for more than ten seconds guaranteed a jamb in 1918. It was a mistake many inexperienced pilots made in the excitement of combat.
The Chase Begins
Manfred von Richthofen who was above the dogfight keeping an eye on Wolfram, noticed the Sopwith Camel of May attacking his cousin. Richthofen used his advantage of height to dive in behind May as the Sopwith Camel dove away. Roy Brown had also been keeping an eye on May and noticed an all-red Triplane[3] diving on May's Camel. Brown dove in pursuit of the red Fokker.
The Sopwith Camel is faster than the Fokker Triplane subsequently Richthofen needed to dive at a point ahead of May to intercept him in a firing position. From eye-witnesses it appeared that Richthofen miscalculated the distance and when his dive ended the Sopwith Camel was out of range of his Spandaus. Richthofen was a master tactician who had added his own dictums to Dicta Boelcke. One of Richthofens rules was to never chase an enemy aircraft on your own in enemy territory. Richthofen broke that dicta in chasing May alone across the Australian lines.
Brown put his aircraft into a forty five degree dive in order to come out on Richthofen's tail at the point he came into firing range. May was wasting his superior speed by zig-zagging in-front of Richthofen who was now rapidly closing on the Sopwith Camel. Richthofen was a superb marksman and a question remains why he didn't dispatch May when he came within range. Franks and Bennett describe it as;
Judging by the events which followed, the probable explanation why a man who was renowned for his accurate shooting failed to dispose of the easy target in-front of him is that his left-hand gun was the only one in working order and it jammed the instant he opened fire. When the breech-block of the gun was later opened on the ground it was found to contain a split cartridge case. This was a fault that could not be diagnosed accurately in the air and a pilot could easily expend useless effort in the hope of clearing it. It fits with the puzzlement of some of the ground witnesses as to why the Triplane's pilot did not take advantage of more than one instance when the Camel was at his apparent mercy.
Richthofen was not a careless larrikin pilot unlike the daredevil American ace Frank Luke or the Australian ace Robert Little. Richthofen was a master tactician who had managed to stay alive for such a long time by not putting himself in positions of extreme risk. Being behind the allied lines with two jambed machine guns and a Sopwith Camel of a Canadian ace directly behind, was exactly such a high risk position that he warned his junior pilots not to put themselves in.
Roy Brown's Attacking Run
Captain Le Boutillier had fired all his ammunition in the dogfight and had disengaged. As he was heading for home he noticed the three aircraft pursuing one another down to his right. Le Boutillier turned his Camel to watch the action. At this moment Brown closed on Richthofen from the left and started firing at about 300 yards range. He fired for the next five to seven seconds in a long burst at the Triplane which would have left him approximately 50 yards behind Richthofen.
Brown's attack had the desired effect. It is likely that Richthofen either noticed tracers passing him by, or his wings were hit by Brown's bullets. Richthofen ceased pursuing May. One of the unintended consequences was that Brown's fire hit an Australian mobile kitchen, holing a mobile stove from which pot-stew began pouring out of. Many of the witnesses to Browns attack were Australian soldiers lined up for lunch at this mobile kitchen.
Browns higher speed led him to overshoot Richthofen and he climbed away in a long climbing turn to the left. Brown had done his job as flight leader and given the young pilot in his charge the chance to escape. Richthofen, now aware of where he was and that there was a British scout behind him, left May to climb the ridge-line. Richthofen climbed the ridge slightly further north before turning east to head for the German lines.
As Brown climbed and turned right he looked to see what had become of May and the red Triplane. Brown saw the red Triplane, still on a flat area near the Saint Collette brickworks. That Richthofen's Triplane force landed soon after Brown's attack was confirmed by Mellersh and May. Brown's Combat in the Air Report (CITAR) read;
Dived on large formation of 15-20 Albatross Scouts DV and Fokker Triplanes, two of which got on my tail and I came out. Went back again and dived on pure red triplane which was firing on Lieut May. I got a long burst into him and he went down vertical and was observed to crash by Lieut Mellersh and Lieut May.
This was the CITAR that the Royal Air Force headquarters stamped as confirmed and decisive.
The Battle From The Ground
The events in the air have been well documented by both official and media resources. The series of events on the ground is not as well documented from official records. The narrative of the events on the ground has largely been pieced together by historians through interviewing witnesses and uncovering forgotten documentation. To isolate the mortal shot, it is important to describe the area the three aircraft flew along, as well as the positions of the anti-aircraft positions.
May, in an effort to get away from his pursuer, had dived down to tree top height near the French town of Sailly-Laurette. With the Somme canal beneath him and Morlancourt Ridge to May's right (north-west) he led Richthofen almost into the church tower of Vaux-Sur-Somme. Directly to the north of Vaux-Sur-Somme up the ridge is the Saint Collette brickworks
At this point Brown comes in at Richthofen from the south with the sun behind him and attacks Richthofen just west of Vaux-Sur-Somme. Brown's run ended at the Darbyshire pontoon bridge along the canal. Brown after attacking peeled off to the south over Vaire-Sous-Corbie and came back up the ridge near the southern bend in the Somme canal and to the west of the pontoon bridge.
After Brown's attack on Richthofen, May passed the pontoon and flew up the ridge. He went directly over the positions of the 53rd and 55th Gun Batteries. On the southern side of the Morlancourt Ridge were situated the anti-aircraft emplacements of the 24th Machine Gun Company. Also on the southern side of the ridge was a platoon from the 51st Battalion who were working on creating trenches to serve as an observation post.
Richthofen, after passing the pontoon broke off the pursuit. He turned to his right and climbed northwest up the ridge toward the Gun Batteries. At this point, Richthofen turned east heading back toward the German lines. It was here that his Triplane did the sudden climbing turn to the right. This was when he mortally wounded.
Richthofen took the northeastern path to the open field near the brickworks on the top of the Morlancourt Ridge. From here his aircraft was visible to the German lines and the Australian infantry pulled his aircraft into a ditch on the north side of the nearby road.
Sergeant Cedric Popkin, 24th Machine Gun Company
Sergeant Cedric Bassett Popkin was responsible for the four Vickers machine guns sighted at the top of Morlancourt Ridge and along the southern slope. Popkin's anti-aircraft battery was part of the Australian 4th Division defences to protect the artillery further north west up the slope from low flying German reconnaissance aircraft.
Normally a Sergeant doesn't man the machine guns instead directing fire against targets. Popkin was an experienced anti-aircraft gunner and on April the 21st he jumped on Private Rupert Weston's machine gun. Weston fed the ammunition belt into the Vickers for Popkin.
As Popkin manned the gun, the Sopwith Camel of May and the Fokker Triplane of Richthofen had passed Vaux-Sur-Somme and were headed for the pontoon. Popkin waited for the Sopwith Camel to pass him and then fired a short burst at the Triplane below him. The Triplane by Popkin's estimate was 60 feet of the ground and at about 150 yards range.
Popkin thought he had hit the Triplane as it wobbled soon after he fired. The bouncing movement made was consistent with the Triplane hitting some turbulent air. The Triplane continued over Morlancourt Ridge toward the Australian artillery. Popkin thought the Triplane would try to return to the German lines and faced his Vickers in a north west direction in the hope of getting another burst in.
Gunners Robert Buie and William Evans, 53rd Australian Battery
Gunners Robert Buie and William "Snowy" Evans were manning Lewis machine gun emplacements on the top of the Morlancourt Ridge to the north-west of the Darbyshire pontoon. Their positions were near the camouflaged artillery of the 53rd and 55th Australian Batteries. The artillery crews were preparing the artillery under the netting and with the clacking buzzsaw sound of the Clerget and Oberursal rotaries of the aircraft the artillery crews stopped to watch.
May and Richthofen came directly at Buie and Evans. The gunners had to wait until the Sopwith Camel got out of the way before they could fire. Evans fired the first burst as May continued on over the ridge beyond the battery emplacements and the Triplane climbed up over the ridge further north from May.
Buie also aimed and fired, emptying a 47 round pannier at the Triplane which was coming directly toward him a little from Buie's right. Even though the triplane was coming directly toward Buie and Evans, it was a difficult shot - especially for gunners who had not been trained for anti-aircraft duty. Franks and Bennett write;
Although the Triplane was an easy target, it was by no means easy to hit. Being low down and close to Buie and Evans, the Triplane was changing position rapidly relative to them and they had to swing their Lewis guns quickly both horizontally and vertically in order to follow it.
and;
An added complication ... was that the Triplane was not moving in the direction it was headed. The Triplane was headed north at approximately 110 mph and air which was supporting it was moving west at 25 to 30 mph. The gunner who merely allowed for the speed of the Triplane, would, by the time he had pulled the trigger, find that the pilot's body had moved about seven to nine feet to the west and his shots therefore would strike somewhere out on the right wings.
From the angle that Buie was firing into the Triplane it would be expected that Richthofen would be hit in the legs or directly in the chest. Despite the attentions of Buie and Evans, the red Triplane continued on until it was almost directly above the artillery. Both Buie and Evans entered claims for Richthofen.
Sergeant Cedric Popkin Fires Again
Popkin and Weston heard the firing of Buie and Evans as well as rifle shots from the battery position and other area's around them. Popkin was banking on the Triplane appearing over the ridge to his north-west and heading south-east. Popkin patience was rewarded and he fired a second burst of 80 rounds at approximately 800 yards. The Triplane was slightly above Popkin and to his right.
Private Vincent Emery and Private Jack Jeffrey were both experienced anti-aircraft gunners who were watching the air and ground battle from their anti-aircraft emplacement at the brickworks. Both were waiting for their crack at the Triplane when they saw the Triplane go into the steep banking turn immediately after Popkin's second burst.
Popkin was not alone in firing at the Triplane at this point. The platoon of Lieutenant R.A. Wood who were digging an observation trench on the lip of the ridge had dropped their shovels and picked up their Lee Enfield. Those that could were firing at the Triplane. Several witnesses reported that not only were their the distinct burst of Lewis and Vickers machine guns from the two positions but also the constant fire from soldiers with rifles.
Popkin entered his claim for Richthofen late and it got stuck in a pile of papers at the 24th Machine Gun HQ. The claim was not dealt with until the 25th of April and by this time the machinations of the RAF HQ had already fallen with Roy Brown. Popkin was, quite rightly it turns out, concerned that his claim did not receive due consideration.
The Striking of the Fatal Bullet
The sudden climb and right hand turn was the point when Richthofen was hit by the bullet that ultimately killed him. This sudden maneuver was known among World War I pilots as the move a right handed pilot makes when reacting to the severe pain a mortal bullet wound imparts in the torso. The climbing turn was an uncontrollable muscle contraction to his wound that pulled the joystick back and to the right.
Richthofen realised he was badly hit and immediately searched for an appropriate landing place before he passed out from lack of blood. The nearest open field in his path was the paddock next to the brickworks. Richthofen took off his goggles and let them drop over the side of the aircraft. He also turned off the throttle on the Triplane to avoid a fire when he landed. Richthofen then put the aircraft into a side-slip and landed it under control. He landed it heavily, bouncing the aircraft and damaging the propeller and left wingtip.
Once the Australian infantry found out who the downed pilot was, the fabled "le Petit Rouge", souveneiring of the plane began almost immediately. By the time the Triplane was recovered by No.3 Squadron AFC and taken to their aerodrome the all-red Triplane was literally a picked carcass.
The First Medical Examination
Richthofen's body was moved along with his aircraft to the aerodrome of No.3 Squadron AFC. When the body was moved, Corporal Edwards McCarty discovered a spent bullet inside the clothing at the front of the body. Pilots of the time wore heavy fur and oilskin coats to protect against the cold. Unfortunately this bullet was lost over time.
On the midnight of the day of Richthofen's death, two doctors from the RAF Wing Headquarters came to examine the body. The doctors performed the examination with an audience of twenty eagle-eyed Australian aircrew watching on. Other than impact injuries from the crash, the examiners only found evidence of a single bullet wound which had entered and exited the body. In the words of Franks and Bennett;
The cause of death had definitely been established; a single bullet through the chest which had caused massive damage to vital organs in its path.
The British Spitzer .303 bullet is designed to tumble after initial penetration into a humans body by losing rotation velocity. The bullet is designed this way in order to do more damage internally to a human body. The medical examiners discovered the only entry and exit holes in the body to be the right and left sides of the trunk respectively.
This is enough distance for a Spitzer bullet to tumble through the body by either two paths. One path is for the bullet to tumble through the lungs and heart. The other path is for the bullet to strike the spine and deflect through the lungs, oesophagus and aorta. Since an autopsy was not done on the body. Both these are speculation as to the path of the bullet. What is undeniable is that the bullets path was ultimately fatal.
The Second and Third Medical Examinations
The second medical examination was the official one and was held by Colonel Thomas Sinclair and Colonel John Nixon of the British Fourth Army. Their report stated;
... The entrance wound is on the right side about the level of the ninth rib, which is fractured, just in-front of the posterior axillary line. The bullet appears to have passed obliquely through the chest striking the spinal column, from which it glanced in a forward direction and issued on the left side of the chest at a level about two inches higher than its entrance on the right and about in the axillary line.
The report also documented Richthofen's broken jaw and the bruising and cuts on his face. These injuries are consistent with an aircraft being landed heavily and the face of the pilot smashing on the machine gun butts. This was a common injury among fighter pilots on a bad landing.
Sinclair and Nixon's report effectively disqualified No.3 Sqn's claim, Browns claim, Buie's claim and Evans claim. None of those four claimants were firing from the right hand side of Richthofen's aircraft. This report was also consistent with a single bullet hole being found in the right hand side of the Fokker Triplane's fuselage.
After Sinclair and Nixon finished two Australian Imperial Force doctors, Colonel Barber and Major Chapman also conducted a perfunctory examination. Barber wrote to the Australian Military historian Charles Bean in 1935;
.. There were only two bullet wounds, one of entry and one of exit of a bullet which evidently passed through the chest and heart. There was NO WOUND of the head ..
All three examinations discredited the view that Richthofen was "riddled with bullets" and all three place the fatal bullet as a singular bullet which entered the right of the body through the fuselage of the aircraft. More importantly once the bullet was in the body it continued in an upward motion. Unfortunately the aircraft was picked to pieces by Australian soldiers souveneiring such that the evidence of the singular bullet hole was lost.
Another observer was Major D.V.J. Blake who stated in "The Battle Below" that he was present in the room when the medical examination by the Medical Examiners of the Fourth Army was undertaken;
He [Blake] further states that there was one bullet wound only, the bullet having entered from the right side at the lower ribs and made exit through the left breast at a point three inches higher than the entry.
Blake also made many inquiries and was personally satisfied that Richthofen was brought down by a bullet fired from the ground.
Official Accreditation
On the morning of the 22nd of April, No.3 Sqn Australian Flying Corps withdrew their claim as it was determined the combat between the squadron's RE8s and Richthofen's Flying Circus was too early to be the decisive combat. At about the same time the recording officer in No.209 Sqn Royal Air Force retyped Browns Combat In The Air Report. Brown and his squadron commander both signed it. Major Butler added to the report, "One Decisive".
In the afternoon of the 22nd Rittmeister Manfred von Richthofen was buried with full military honours by No.3 Squadron Australian Flying Corps. On the 23rd a Royal Air Force aircraft dropped photographs of the grave over the German lines so that the Luftstreitkrafte would know of the Red Barons grave and that he had been buried with the respect due their greatest Ace.
Royal Air Force Headquarters decided to go ahead with full support for Browns claim even though they were aware of the first two medical examinations which suggested ground fire was the cause of Richthofen's demise. The justification was partly decided on the basis of morale as the Royal Air Force had suffered considerably in the previous months. It is believed that Royal Air Force HQ told the NO.209 Squadron pilots not to mention the matter to anyone. Until their deaths, the No.209 Squadron pilots recounting of the events followed the Royal Air Forces version.
Who Killed The Red Baron?
The main claim and the official accreditation was given to Captain Roy Brown of No.209 Squadron RAF. Roy Browns attack from long range and closing from above was from the left and rear of Richthofen's Triplane while the bullet wound was from the right and slightly below. The attack undoubtedly took the focus of attention away from May ensuring May did not become Richthofen's 81st victim.
Gunner Buie's and Gunner Evans claim was from short range at a target with rapidly changing relative position. The angle Buie and Evans both fired from was in-front of the Triplane which would suggest that any bullets that hit the body of Manfred von Richthofen would have been in the legs or chest. Buie and Evans also fired a considerable time before the red Triplane did the sharp climb and landed near the brickworks.
The second burst Popkin fired was at long range from the correct upward angle. In Popkin's favour is that after his second burst the Triplane took the sudden climbing turn which is consistent with a right handed pilot being painfully wounded while flying. As there was only one bullet wound in Richthofen, if it was Popkin's fire that downed Richthofen it was at the very edge of his machine guns pattern. The range he fired at is also consistent for a bullet to not be able to break the thick flying clothing of a pilot after losing momentum by passing through a human body.
The platoon commanded by Lieutenant Wood were near Popkin's machine gun position and many of them dropped their tools for rifles to have a crack at the Triplane. The platoon was firing the correct bullets, they were firing from the correct range and angle to have the type of bullet wound Richthofen suffered and for the bullet to expend its energy by passing through the pilot's body, ending up inside his clothing. All eye-witnesses reported the large amount of rifle fire that was occurring in addition to the machine gun fire.
Conclusion
Cedric Popkin and Lieutenant Wood's platoon were the ones that were firing at the correct range and angle when Richthofen's aircraft pulled up sharply indicating his fatal wound. Franks and Bennett consider Woods platoon but remark that the volume of machine gun fire makes it more likely that the bullet came from a machine gun. In the word of the authors of, "The Red Barons Last Flight", Franks and Bennett conclude;
The authors [Franks and Bennett] find the evidence and probabilities, based on logic, indicate that the honours belong to Sergeant Cedric Bassett Popkin.
The research work of numerous aviation historians over the last 80 years effectively put paid to the validity of a claim from the air. Richthofen was brought down from ground fire with the highest probability being from the Vickers machine gun of Cedric Popkin or the rifle of an unknown soldier on the southern slope of Morlancourt Ridge.
Unfortunately focusing on who killed Manfred von Richthofen is to lose sight of the ultimate tragedy of this event. Through humanity's unrelenting passion for organized warfare, one of the greatest natural leaders and most courageous achievers of the twentieth century was lost. Richthofen was adored by his peers and deeply respected by his foes. He was twenty five years old.
Footnotes
1. The leading aces of World War I were Manfred von Richthofen (80, Germany), Rene Fonck (75, France), Billi Bishop (72, Canada), Ernst Udet (62, Germany), Raymond Collishaw (62, Canada) and Edward Mannock (61, England).
2. The losses for the Royal Flying Corps in April of 1917 were so heavy and unprepared for that the month became known as "Bloody April" by RFC aircrew. The RFC was unprepared for the technical and operational changes which the German forces introduced. The German Albatros was armed with two machine guns and had a powerful 160 horsepower engine. In addition the Dicta Boelcke was in wide use as the standard operational pattern. Britain improved their aircrew training and introduced more powerful aircraft to the front by the end of 1917. The Royal Navies blockade of Germany ensured that British and French industry would not be technically behind Germany for the rest of the war.
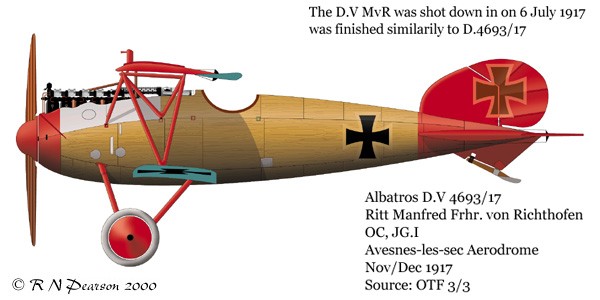
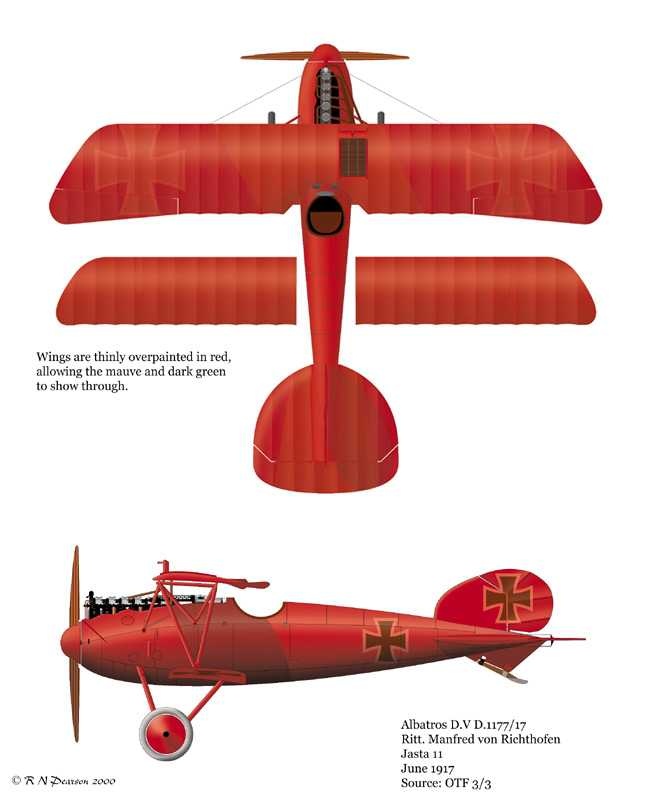
3. Manfred von Richthofen flew many different aircraft with varying amounts of red on them. Orthochromatic film used in World War I showed the warm colours as black and faded the cool colours out. Subsequently in photos, Richthofen's aircraft often appear to have black markings. Some colour profiles of Richthofen's aircraft include Bob Pearson's profiles of Albatros DV 4692/17 and Albatros DV D.1177/17, plus Todd Comeau's profiles of Fokker Triplane 152/17 and Fokker Triplane 425/77.
References
- The Australian Flying Corps. The Official History of Australia in the War of 1914-1918. Volume VIII. F.M. Cutlack. 1999 (1923)
- The Battle Below. Being the History of No.3 Squadron Australian Flying Corps. Harry N. Wrigley. 1935
- Memories Of No.3 Squadrons Australian Flying Corps. An interview with Harold Edwards. Adrian Hellwig
- The Red Air Fighter. Manfred von Richthofen. 1999 (1917 as Der Rotte Kampfflieger). This has been published online at http://www.richthofen.com/
- The Red Baron Combat Wing. Jagdgeshwader Richthofen in Battle. Peter Kilduff. 1997
- The Red Baron's Last Flight. A Mystery Investigated. Norman Franks and Alan Bennet. 1997
- The Red Knight Of Germany. Floyd Gibbons. 1964 (1927)
- Royal Air Force 1918. Communiques from April 1918 to November 1918. Christopher Cole. 1968
- Under the Guns of The Red Baron. The Complete Record of von Richthofen's Victories and Victims Fully Illustrated. Norman Franks, Hal Giblin and Nigel McCrery. 1999


